Best way to Organize a Laundry Room: A 5-Step Safety Guide
If you feel like you are always washing, sorting, or folding, you are not imagining things. Laundry is officially the third most time-consuming household task in the United States, which is why learning how to organize laundry room layouts has become a necessity for modern families. An average American household runs 300 to 390 loads of laundry every year—averaging 5.7 loads a week—which translates to more than 240 hours of labor annually per household. This physical load is rarely shared equally, as time-use data shows that women spend an average of 87.6 hours per year on laundry, compared to just 29.2 hours spent by men.
When your utility area is disorganized, this relentless chore cycle quickly turns into a source of daily mental fatigue, visual noise, and chaos. But establishing an efficient workflow means looking past unrealistic social media design trends. The most powerful way how to organize laundry room setups is to base them on physical ergonomics, low-friction behavioral habits, and non-negotiable household safety standards. By focusing on practical help rather than heavy shopping lists, this guide will show you how to simplify your space, protect your back, and save hours of weekly labor.
1. The Spatial Rules of How to Organize Laundry Room Layouts
To understand how to organize laundry room floor plans, you must start with the physical footprints of your machines. If you do not plan for precise clearances, even the most beautiful cabinetry will lead to pinched water lines, crushed vents, and cramped walkways.
Side-by-Side vs. Stacked Machine Clearance
Your layout design hinges entirely on how your washing machine and dryer are positioned.
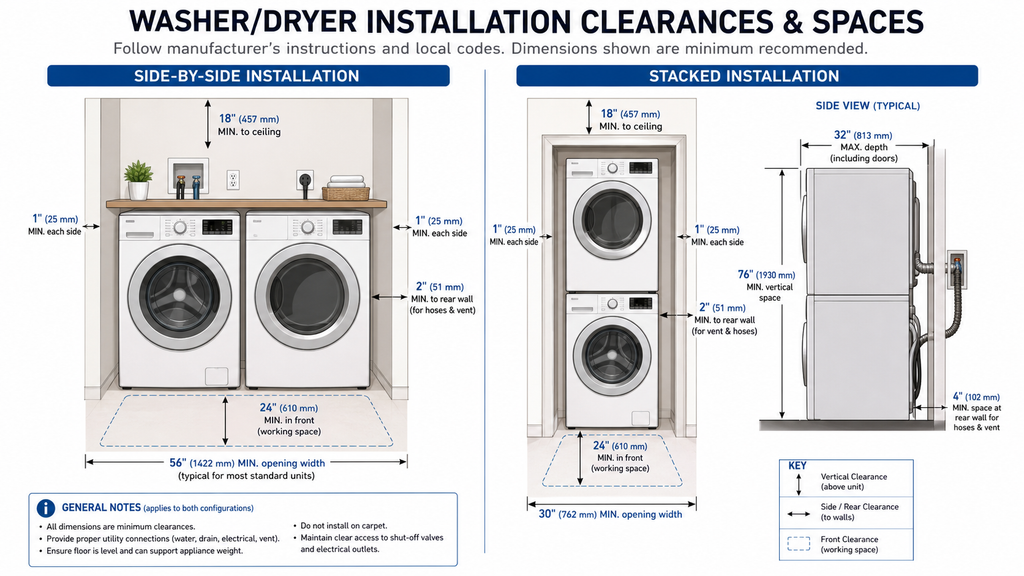
For front-loading machines placed side-by-side, you need a minimum of 56 to 60 inches of horizontal width. Stacking your units is a fantastic way to save space in apartments and tight closets. This setup shrinks your floor footprint to under 30 inches wide, but it demands a vertical clearance of 60 to 76 inches.
Regardless of your setup, you must plan for these three structural clearances:
- Rear Clearance (6 inches): You must leave at least 6 inches of empty space behind both units. Pushing machines flush against the wall will crush the flexible dryer exhaust duct—restricting airflow and creating a serious fire hazard—and kink your water supply hoses.
- Side Clearance (1 inch): Leave a 1-inch gap between the machines and adjacent walls. Front-loading washers vibrate aggressively during high-speed spin cycles; without this gap, they will rattle against walls and damage your drywall or cabinetry.
- Front Clearance (48 inches): You must preserve a minimum of 48 inches of clear walkway space in front of the appliances. This is the clearance required to fully swing the doors open and kneel down with a laundry basket without getting pinned against the opposite wall.
Front-Load vs. Top-Load Door Swing and Lid Clearances
Front-loading units are highly popular because they let you place a continuous, broad folding countertop directly on top of them. Top-loading machines require a completely different approach. Because their lids open vertically, they cannot accommodate a countertop directly on top of them. A top-loader lid requires 52 to 58 inches of vertical clearance to swing open fully. If you have top-loading machines, you should plan for 18 to 42 inches of free counter space adjacent to the units instead.
Ergonomic Standards: How to Organize Laundry Room Widths & Depths
When planning how to organize laundry room cabinetry, these dimensions ensure comfort and usability:
- Base Cabinet Depth (24 inches): Lower cabinets are designed at a depth of 24 inches. This depth allows you to integrate deep, pull-out laundry baskets or slide heavy detergent containers completely out of sight.
- Upper Cabinet Depth (12 to 16 inches): Upper wall cabinets should be kept between 12 and 16 inches deep. This keeps frequently used items within arm’s reach while preventing you from bumping your head when bending over the counter.
- Countertop-to-Cabinet Gap (18 inches): Always leave a minimum vertical clearance of 18 inches between your countertop and the bottom of your upper cabinets to give yourself a comfortable, uncrowded workspace.
- Countertop Height (36 to 42 inches): Standard countertops sit at 36 inches high. However, if you are tall or struggle with lower back pain, raising the folding surface to 42 inches is a simple way to eliminate repetitive lumbar strain.
Choosing Between Closed Cabinets and Open Shelving
Both storage options offer distinct practical trade-offs:
- Closed Laundry Cabinets: Closed cabinets are unmatched for hiding visual clutter, blocking airborne lint and dust, and presenting a clean, cohesive look. Most importantly, they allow you to install automatic childproof safety latches to keep household chemicals safely locked away. The primary downsides are the higher upfront cost and the fact that solid doors can make a tiny utility room feel even smaller.
- Open Laundry Shelving: Wall-mounted shelving is highly accessible, budget-friendly, and makes a cramped laundry closet feel airy and open. It also lets you take an instant visual inventory of your supplies so you do not buy duplicate bottles. However, open shelves require constant tidying, collect a layer of dryer lint over time, and leave hazardous cleaning products fully exposed to kids and pets.
Universal Accessibility (ADA Compliant Design)
If you are designing for family members with mobility challenges, chronic back pain, or wheelchair users, minor adjustments to your layout can make the space fully inclusive:
- Side-by-Side Front-Loaders: Position front-loading machines side-by-side rather than stacked, which keeps all controls and drums within a seated reach range.
- Pedestal Platforms: Elevating both appliances on secure, structurally anchored pedestal platforms of 1.5 to 2 feet brings the drum openings to waist level. This simple modification allows you to load and unload clothes without painful bending or stretching.
- Hardware and Walkways: Swap out standard circular cabinet knobs for easy-to-use lever-style handles. Ensure your walkways maintain a minimum clearance of 36 inches (ideally 42 inches between opposing cabinet doors) to allow a wheelchair or walker to navigate the room smoothly.
2. How to Organize Laundry Room Workflows
Many people wonder how to organize laundry room spaces so they actually stay tidy over time. Most home organizing systems fall apart because they require too much physical or mental energy to maintain. If your system demands that you meticulously fold every t-shirt immediately, you will inevitably end up with a mountain of clothes on your living room furniture by Thursday night. Lasting organization relies on low-friction, behavior-driven habits.
The Industrial Single-Direction Workflow Sequence
To prevent chores from bottlenecking, structure your routine like a linear, one-way assembly line. The work must flow in a non-intersecting sequence:
To make this work physically:
- Keep dirty hampers near the entrance of the room where clothes naturally arrive.
- Position your stain pretreatments and detergents directly adjacent to the washing machine.
- Keep hangers and dryer accessories right next to the dryer exit.
- Position your folding counter or table right next to the dryer door.
If your clean and dirty zones cross paths, you will waste time carrying piles back and forth, and you risk contaminating freshly washed clothes with dirty garments.
The No-Fold “Ladybug System” for Easy Tidying
Traditional organizing guides insist on folding everything. The behavioral “Ladybug System” acknowledges a simpler truth: items like socks, underwear, pajamas, and synthetic athletic wear do not wrinkle easily and do not need to be folded.
Instead of wasting time folding these categories, simply drop them directly into dedicated, opaque storage bins. Opaque canvas or woven baskets keep the room looking clean and organized while cutting your weekly folding time in half.
Individualized Source-Sorting
The biggest bottleneck in a family laundry routine is sorting a massive, mixed pile of clean clothes. You can eliminate this chore entirely by sorting at the source.
Place separate, personal hampers in each family member’s bedroom or bathroom. When a person’s hamper is full, run it as a single, dedicated load. Once it is dry, return the clean clothes in bulk directly to their room. This completely bypasses the tedious step of sorting through a giant, collective clean clothes pile on the couch.
The “Dumb Boxing” System for Miscellaneous Storage
Laundry rooms frequently become a dumping ground for non-laundry items like tools, lightbulbs, cleaning rags, and pet supplies. Forcing these random items into highly specific categories is exhausting and quickly leads to messy cabinets.
Instead, use the Dumb Boxing method:
- Gather your miscellaneous, non-laundry items and place them in identical, numbered, opaque bins.
- Open a simple digital note on your phone.
- Type the box number and a quick list of what is inside (e.g., “Box 2: lightbulbs, dog leash, heavy-duty extension cord”).
When you need an item, a quick search on your phone notes tells you exactly which box to open. Your cabinets stay uncluttered, and you never waste time digging through drawers.
To keep lightweight cleaning tools organized and off the floor, utilize empty wall space:
- Our Amazon recommendation: Outnili Mop & Broom Wall-Mounted Holder
- Why it’s useful: This 14.5-inch holder features three spring-loaded slots to grip broom and mop handles securely and four utility hooks for dustpans and cleaning cloths.
- Who it suits: Excellent for busy parents and homeowners looking to free up floor space by utilizing empty vertical walls.
- Limitations: Built with a blend of wood and metal, it is designed for standard, lightweight cleaning tools; it cannot support heavy industrial equipment.
3. How to Organize Laundry Room Closets on a Budget
If you have tight quarters, learning how to organize laundry room setups without drilling is essential. If you are working with a tiny laundry closet under 30 square feet or need to preserve a rental security deposit, focus entirely on vertical, non-destructive, and mobile storage options.
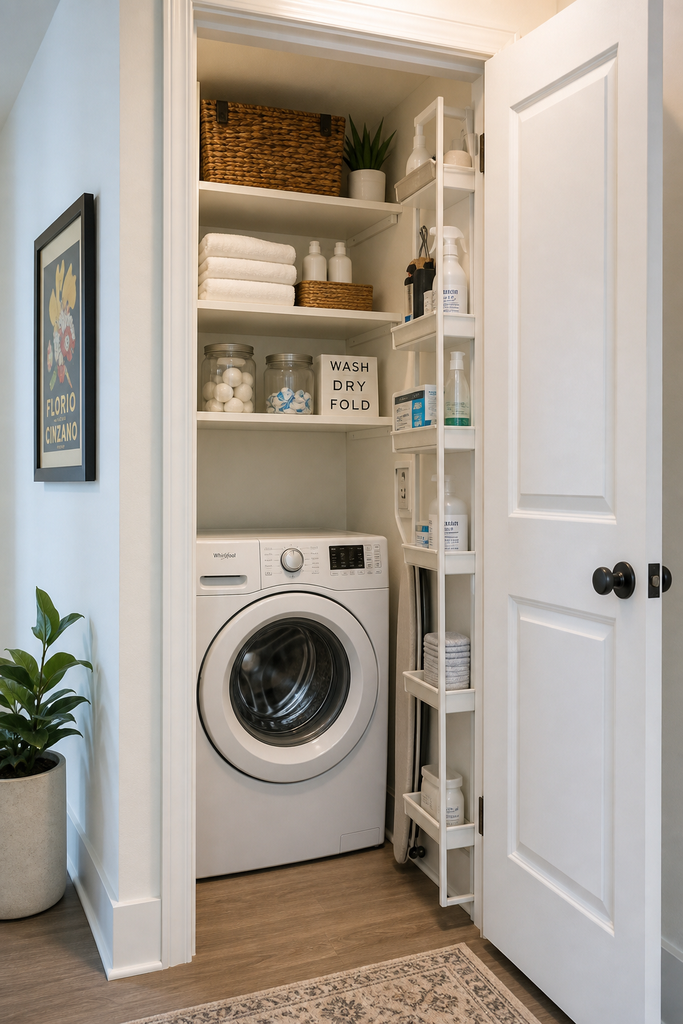
- Freestanding Over-Machine Shelving: Avoid drilling holes into walls by using a freestanding steel frame that sits directly over your washer and dryer. This instantly adds two or three deep shelves of vertical storage.
- Non-Destructive Wall Storage: Use heavy-duty adhesive hooks, like Command Hooks, to hang lightweight utility items, small ironing boards, and mesh laundry bags on empty wall space.
- Appliance Gap Storage: Utilize the narrow, wasted space between your appliances or adjacent walls. A slim rolling cart is the perfect solution for storing detergents and cleaners in tight configurations.
- Our Amazon recommendation : Spacekeeper 3-Tier Rolling Storage Cart
- Why it’s useful: Measuring only 8.6 inches wide, this three-tiered cart easily slides into the narrow, wasted gaps between machines or walls. It features easy-glide wheels and hollow-carved shelves that comfortably fit standard detergent bottles.
- Who it suits: Ideal for renters and apartment dwellers operating in tight, compact laundry closets.
- Limitations: Constructed of lightweight plastic, it is highly durable for detergents but can feel slightly top-heavy if you load the upper tier with oversized liquid jugs.
Premium Built-In Upgrades for Homeowners
Homeowners with a dedicated laundry room (averaging 9 x 11 feet) have the opportunity to install permanent, value-adding built-in structural assets.
- Custom Ceiling-Height Cabinetry: Install custom-fitted utility cabinets that extend completely flush to the ceiling. This adds critical storage for out-of-season items while eliminating the dust-catching gap above standard cabinets.
- Over-Appliance Countertops: For side-by-side front-loading washers, install a continuous countertop made of waterproof quartz or compact laminate directly over the machines. This provides a massive, high-performance workspace for pre-treating, sorting, and folding laundry.
- Integrated Drawers: Choose heavy-duty slide-out drawers rather than standard lower cabinets with doors. Pull-out drawer systems are far more ergonomic, as they slide outward to give you a full, overhead view of your laundry baskets and heavy cleaners without requiring you to bend down and reach into dark cabinet backs.
- The Dedicated Laundry Room Setup: For those designing a dedicated laundry room—a true, hard-working laundry room setup—extending custom cabinetry to the ceiling and integrating drop-in sinks represents the gold standard of space optimization.
4. Safe Containment: How to Organize Laundry Room Chemical Hazards
Safety should always guide your planning when researching how to organize laundry room cabinetry and shelving. Social media platforms frequently promote highly stylized organization trends that represent severe chemical hazards, particularly for young children or family members with cognitive impairments.
The Toxic Truth of Concentrated Detergent Pods
Single-dose liquid laundry detergent pods are highly concentrated, toxic chemical packets. Between January 2014 and December 2022, US poison centers recorded more than 114,000 toxic exposures to laundry pods in children under six.
- The Chemical Mechanism: The outer membrane of a liquid laundry pod is designed to dissolve instantly upon contact with moisture (including saliva, wet hands, or eyes).
- The Clinical Danger: When a child bites into a pod, the membrane ruptures under pressure, spraying highly concentrated corrosive chemicals into the mouth, eyes, and throat. This can cause severe chemical burns to the esophagus and stomach lining, airway swelling that requires emergency intubation, temporary blindness, respiratory distress, coma, or death.
Safe Chemical Containment Directives
To prevent accidental poisoning, the Consumer Product Safety Commission (CPSC) and the American Academy of Pediatrics (AAP) enforce strict storage guidelines:
- Ditch Glass Containers: Never decant liquid detergent pods into clear glass apothecary jars. While highly popular on social media, displaying pods in clear glass canisters makes these highly toxic chemicals look exactly like candy or toys, attracting curious children.
- Keep in Original Packaging: Always keep concentrated pods in their original, opaque packaging fitted with child-resistant closures.
- High-Altitude Storage Only: Store all laundry pods, bleach, fabric softeners, and chemical pre-treatments in high cabinets equipped with automatic safety latches. Never store chemical supplies in low drawer pedestals or pull-outs below your washing machine, as these are fully accessible to toddlers and crawling pets.
- Emergency Protocol: Keep the US Poison Control Helpline number (1-800-222-1222) programmed into your phone and posted clearly in the laundry room. If exposure occurs, flush eyes with water for 15 minutes, rinse the mouth thoroughly, and call emergency services immediately—do not induce vomiting.
If you are a homeowner seeking a safe, solid wood or engineered wood storage solution that is lockable to keep chemical laundry supplies safely out of reach:
- Our Amazon recommendation: Shintenchi 2-Drawer Farmhouse Storage Cabinet
- Why it’s useful: This freestanding farmhouse cabinet stands at an ergonomic 34.9 inches tall and features a sleek engineered wood build with two deep, smooth-glide drawers. It is perfect for storing bulk detergents, heavy bleach containers, and household tools completely out of sight.
- Who it suits: Homeowners seeking a durable, stylish cabinet upgrade that adds aesthetic value while keeping heavy cleaning agents securely locked behind closed doors.
- Limitations: This is a solid, heavy-duty furniture piece; it requires standard assembly and dedicated floor space in a medium-to-large room.
5. Material Selection & Environment Care
Because laundry rooms are subject to high humidity, temperature swings, and chemical spills, selecting correct materials is vital to prevent mold growth and surface decay.
Waterproof and Chemical-Resistant Surfaces
Due to the risk of bleach spills and condensation, your surfaces must be highly durable and non-porous:
- Countertops: Quartz, ceramic tile, and compact laminate countertops are highly recommended. They are completely waterproof, stain-resistant, and will not warp from dryer heat. While natural butcher block wood is aesthetically popular, it is highly porous and requires regular sealing with marine-grade varnishes to prevent wood rot and warping.
- Cabinetry: Choose matte lacquered cabinet doors. Matte lacquer is waterproof, easy to wipe clean, and resistant to hygrometric expansions, unlike untreated solid woods which swell and warp in damp spaces.
- Flooring: Install ceramic, porcelain tile, or waterproof luxury vinyl planks (LVP). Avoid natural hardwoods or standard laminates, which can bubble and decay from minor appliance leaks.
Lighting and Ventilation Solutions
Proper ventilation is crucial to protect your walls from moisture damage and avoid musty odors:
- Ventilation: Laundry drying releases a massive amount of damp air into the room. Ensure your space has a robust mechanical exhaust fan or an exterior window measuring at least 40 x 60 cm to pull out moist air. If your utility space is located in a windowless closet with poor ventilation, running a portable dehumidifier or a slender column fan after drying cycles is essential to circulate air and prevent mold buildup.
- Lighting: Task lighting is essential for spotting clothing stains and sorting fabric colors. Install bright, energy-efficient LED task lights directly under your upper cabinets. Ensure all light fixtures installed in the laundry room are damp-rated to safely handle high humidity levels.
Structural Comparison Tables
Table 1: Standard Architectural Clearance Metrics
| Planning Metric | Imperial Standard | Metric Conversion | Ergonomic & Functional Rationale |
|---|---|---|---|
| Side-by-Side Width | 56 to 60 inches | 142 to 152 cm | Accommodates standard side-by-side washers and dryers comfortably. |
| Appliance Depth | 27 to 34 inches | 68 to 86 cm | Required depth for front-loading machine bodies. |
| Rear Clearance | Minimum 6 inches | 15 cm | Essential space to house vents, water hoses, and gas lines safely. |
| Front Clearance | Minimum 48 inches | 122 cm | Walkway clearance to allow full front door swings and loading access. |
| Countertop Height | 36 inches | 91 cm | Optimal standing folding height to prevent lower back strain. |
| Lower Cabinet Depth | 24 inches | 61 cm | Standard depth to house built-in hampers and laundry bins. |
| Upper Cabinet Depth | 12 to 16 inches | 30 to 40 cm | Prevents users from hitting their heads while working at countertops. |
| Cabinet Clearance | Minimum 18 inches | 46 cm | Standard vertical gap between countertops and upper wall cabinets. |
| Minimum Walkway | 36 inches | 91 cm | ADA standard; allows navigation carrying heavy baskets. |
| Optimal Walkway | 42 inches | 107 cm | Comfortable clearance between opposing cabinetry doors. |
| Open Top-Loader Lid | 52 to 58 inches | 132 to 147 cm | Required vertical clearance for top-loading washing machine door swings. |
Table 2: Open Shelving vs. Closed Cabinetry
| Storage System | Primary Pros | Primary Cons | Safety Profile | Best Budget Alignment |
|---|---|---|---|---|
| Open Shelving | • Low-cost install• Instant visual inventory• Makes tight spaces feel open | • Collects dust & lint easily• Demands constant styling to avoid looking messy | Dangerous for families; leaves toxic detergent pods and chemicals fully exposed. | Low to Moderate (Inexpensive DIY options). |
| Closed Cabinetry | • Conceals visual clutter• Blocks airborne lint & dust• Creates a built-in custom look | • Higher upfront purchase cost• Cabinet doors require swing space in narrow rooms | Highly Secure; easily fitted with automatic childproof locks and safety latches. | Moderate to High (Requires professional builds). |
Actionable Weekly Reset Checklist
To prevent clutter from gradually creeping back into your utility space, dedicate just 10 minutes every Sunday to executing this quick reset:
- Toss & Recycle: Throw away empty detergent jugs, dryer sheets, and expired products.
- Secure Chemicals: Verify that all detergents and bleach pods are securely stored in their original packaging inside high cabinets fitted with locked safety latches.
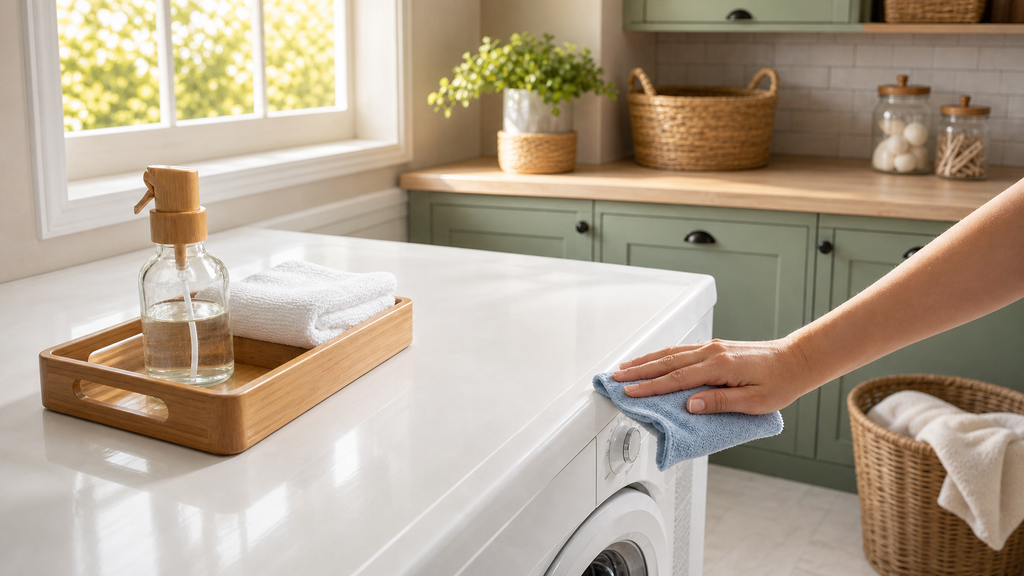
- Wipe Down Units: Wipe down the exterior surfaces of your washer and dryer to keep them free of dust, lint, and sticky detergent spills.
- Clear the Floor: Return all stray hangers to their racks and ensure walkways are completely clear to maintain safe, trip-free pathways.
- Reset the Note: Take 5 minutes to sweep, wipe surfaces, and confirm your basic how to organize laundry room routines are in place.
Frequently Asked Questions
1. How do I organize a small laundry room or laundry closet when floor space is extremely tight?
To learn how to organize laundry room closets with limited square footage, focus entirely on vertical space. If your appliances are compatible, stack your dryer above the washing machine to shrink your floor footprint to under 30 inches wide. Mount floating shelves directly above the appliances to store everyday laundry products. Use an over-the-door hanging rack to hold accessories, and slide a slim 6-to-8-inch rolling utility cart into the gap beside your washing machine to maximize otherwise wasted space.
2. What are the main pros and cons of open shelving compared to closed cabinetry in a laundry room?
Open shelves allow for fast access to your supplies, let you take an instant visual inventory of your products, and are highly budget-friendly. However, they accumulate lint and dust easily, require constant styling to avoid looking cluttered, and leave household chemicals exposed. Closed cabinetry keeps the room looking clean and hides visual clutter, but it costs more and can make a tiny room feel closed in. From a safety perspective, closed cabinets are highly recommended for families with young children because they can be locked with automatic childproof latches to secure toxic supplies.
3. How do I manage high humidity, condensation, and musty odors in enclosed laundry rooms?
To prevent high humidity from causing mold and musty odors on walls and stored linens, you must ensure active air circulation. Install a robust mechanical exhaust fan paired with a 40 x 60 cm ventilation window or air vent. In windowless utility closets, use a portable column fan or an electric dehumidifier after running dryer cycles to pull moisture from the air. Additionally, store clean towels and sheets in breathable fabric boxes or wicker baskets rather than airtight plastic bins, which can trap residual moisture.
4. What is the most efficient way to wash and fold large linens like bedsheets without crowding the room?
Large bedsheets can bundle up during washing cycles, creating a heavy pocket of fabric that traps other clothes and prevents proper spinning. To avoid this, wash sheets as separate loads and use wool dryer balls to keep fabrics separated. For efficient folding, install a continuous countertop directly over side-by-side, front-loading machines to create a wide folding station. In smaller rooms where a countertop is not feasible, install a wall-mounted fold-down table that sits at an ergonomic 36-inch height and folds flat against the wall when not in use.
5. How should I handle, wash, and dry heavy winter coats or hand-washed delicates safely?
Heavy winter coats and hand-washed garments hold a massive amount of water, making them slow to dry and prone to dripping water onto the floor. To prevent this, install a deep utility sink (at least 24 to 30 inches wide) near the entrance of your laundry room to pre-treat, soak, and rinse heavy items. Hang delicate items to dry on a wall-mounted retractable drying rack installed directly over the utility sink so excess water drains safely into the basin. Finally, use a solid quartz or compact laminate countertop to dry wool sweaters flat on clean towels without risking water damage to your cabinetry.