Small Kitchen Drawer Organization: 7 Steps to Maximize Tight Spaces
This article contains affiliate links. If you purchase through these links, we may earn a small commission at no extra cost to you.
We’ve all been there: you’re in the middle of preparing dinner, your stove is sizzling, and you reach for a spatula—only for the drawer to jam. You tug, you wiggle, and you find a chaotic tangle of whisks, tongs, and ladles holding your kitchen drawer hostage. In a small kitchen, these daily micro-frustrations can turn cooking into an exhausting chore.
But here is the good news: you don’t need a massive, high-end kitchen to enjoy an effortless, stress-free culinary experience. The secret lies in mastering small kitchen drawer organization. By maximizing every square inch of your available under-counter drawer storage, you can unlock a highly functional, seamless workflow.
In this ultimate guide, you’ll learn how to organize kitchen drawers, discover the best drawer organizers for small kitchens (including a head-to-head breakdown of bamboo vs plastic drawer organizers), and find out exactly how to stop drawer organizers from sliding forever. Let’s dive in and transform your cramped drawers into models of efficiency!
1. Why Drawers Are the Secret Weapon of Small Kitchen Ergonomics
When designing or optimizing a small space, we often focus on cabinet shelving. However, in ergonomic kitchen design, swapping traditional lower cupboards for under-counter drawer storage is an absolute game-changer.
While deep drawers are typically more expensive to manufacture than standard cupboards, they offer vastly superior ergonomic benefits. Instead of bending down, crouching, or using a flashlight to search the back of dark cupboards, deep under-counter drawers maximize accessibility by bringing your items directly to you.
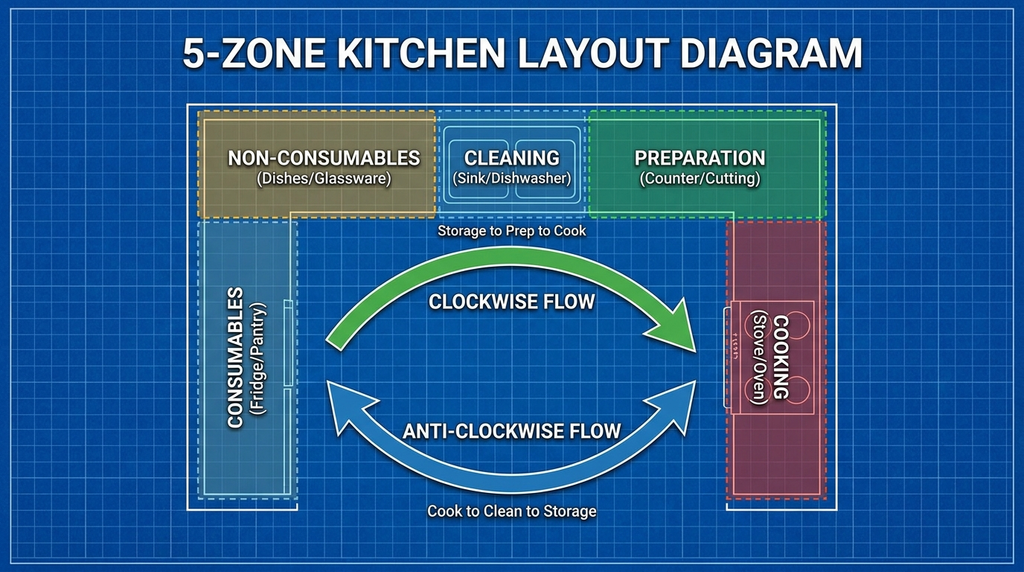
To achieve a professional, highly efficient workflow, professional kitchen designers use the 5-Zone Kitchen Layout. This layout groups your kitchen into five distinct operational zones:
- Consumables (food, pantry items)
- Non-consumables (plates, bowls, everyday cutlery)
- Cleaning (sink, dishwasher, trash, cleaning supplies)
- Preparation (mixing bowls, cutting boards, prep utensils)
- Cooking (pots, pans, baking sheets, stove-side utensils)
For a smooth workflow, these zones should flow in a clockwise direction for right-handed cooks and an anti-clockwise direction for left-handed cooks.
Within this setup, the Prep Zone Rule is paramount: efficient food preparation requires at least 900mm of uninterrupted, flat workspace. This area is ideally positioned directly between your sink and your stove to minimize unnecessary movements. Maximizing your small kitchen layout by organizing drawers to support these specific zones ensures that everything you need is exactly where you use it.
2. The Golden Rule of Small Space Organizing: Empty, Sort, and Divide
When tackling a small kitchen, the temptation is to shuffle items around inside the drawer. This is a mistake. To achieve a long-lasting, clutter-free setup, you must follow the Universal Three-Step Rule: Empty, Sort, and Divide.
Here’s how to apply this step-by-step drawer organization framework:
- Empty: Remove every single item from the drawer. Wipe the bottom clean of any crumbs or dust.
- Sort: Group like with like. Separate daily-use flatware from occasional baking tools. Group cooking utensils, spices, and gadgets.
- Divide: Place physical dividers into the drawer to assign a permanent home to each category.
The reality of small space organizing is simple: without physical dividers, any kitchen drawer will inevitably slide back into chaotic disorder within a single week.
If you feel overwhelmed, start small. Focus on organizing your high-use daily drawers first—such as your flatware and everyday cooking utensils—to build immediate momentum and experience the immediate benefits of an organized space.
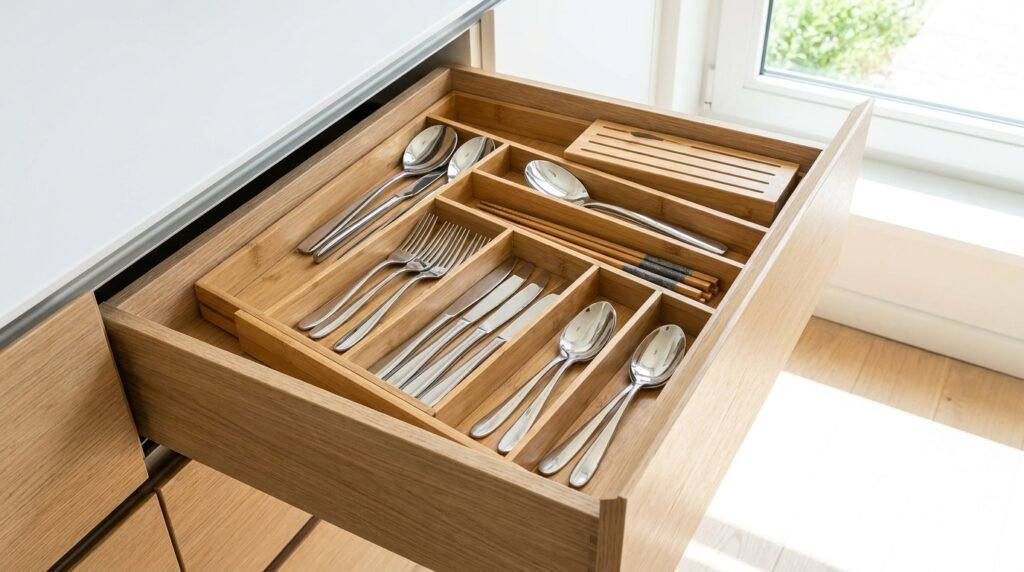
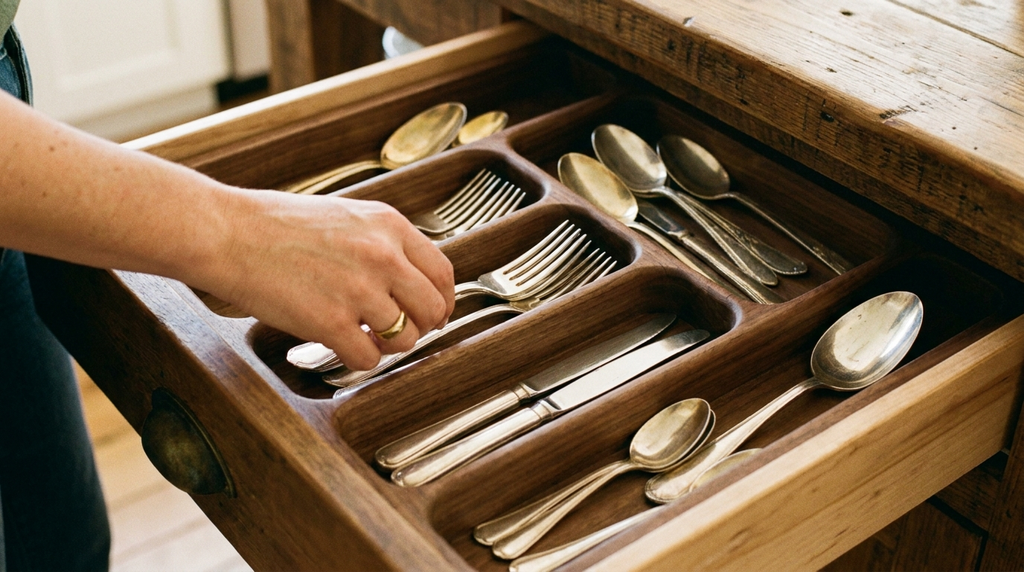
The Small-Space Recommendation: Expandable Bamboo Drawer Dividers
To immediately implement the “divide” step, we highly recommend investing in expandable dividers. Unlike fixed-size inserts, expandable dividers fit drawers of various widths and depths, allowing the organizers to adapt as your kitchen needs and tool collections grow over time.
3. The 6-Step “Junk Drawer” Rescue: Shifting to a Utility Mindset
We all have one: that notorious drawer filled with half-used tape rolls, dead batteries, loose receipts, and random screws. But in a small kitchen, every square inch of storage space is premium real estate.
To rescue your kitchen, you must make a mental shift: banish the word “junk.” If an item has no clear purpose or utility in your day-to-day life, it does not deserve to occupy space in your kitchen. Instead, rename this drawer the Utility Drawer and treat it with the respect it deserves.
Follow this professional 6-Step Reset System to transform your utility drawer:
- Empty & Wipe: Empty the drawer completely and wipe the interior clean of dust and debris.
- Declutter & Audit: Inspect every single item. Test every pen on paper, test batteries, check tape rolls, and immediately discard anything that is dried out, empty, or broken.
- Relocate Outliers: Be ruthless. Screwdrivers, hammer nails, and heavy tools belong in the garage. Extra phone charging cords, adapters, and office supplies belong in your home office. Keep only true household daily utilities.
- Group into Categories: Sort the remaining items into clear, logical categories. Group scissors, tape rolls, rubber bands, batteries, and lighters.
- Add Modular Dividers: Use individual, modular drawer organizer trays to create dedicated slots for each category, preventing items from shifting into a single messy pile.
- Prep for Use: Make items ready at a moment’s notice. For example, fold the end of a tape roll over slightly so you can grab it easily next time, and pair batteries of the same size together in small modular compartments.
Recommended Utility Organizers: Luxe Acrylic Drawer Organizer Set
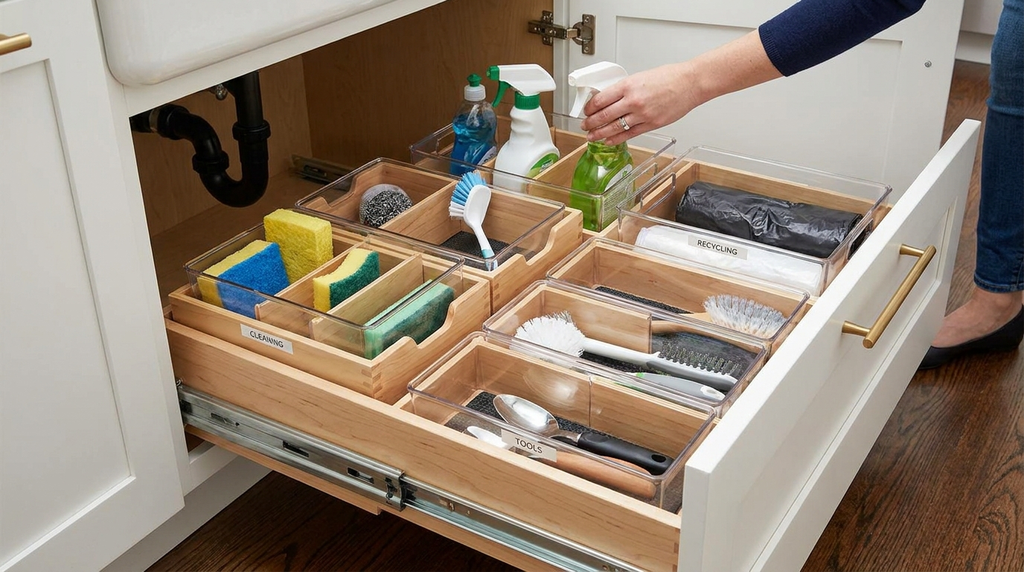
Using modular trays or a high-quality acrylic drawer organizer set allows you to customize the layout of your utility drawer. These individual clear containers let you fit tiny utility items (like paperclips, rubber bands, and matchboxes) perfectly without wasting any vertical or horizontal space.
4. Bamboo vs. Plastic Organizers: Which Material Wins in a Kitchen?
When shopping for the best drawer organizers for small kitchens, you will inevitably find yourself choosing between two dominant materials: bamboo and plastic. To help you make an informed decision, let’s compare them across five rigorous, source-grounded criteria:
Head-to-Head Comparison: Bamboo vs. Plastic Drawer Organizers
| Feature / Criteria | Bamboo Drawer Organizers | Plastic Drawer Organizers |
|---|---|---|
| Durability & Hardness | Winner. High-density Moso bamboo is 3x harder than common plastics (like polypropylene or ABS). Its tensile strength rivals steel by weight, preventing it from bowing under heavy utensils. | Polypropylene and ABS plastics rate very low on the Brinell hardness scale. Flimsy construction easily warps, bows, or cracks within 1–2 years of daily use. |
| Hygiene & Food Safety | Winner. Bamboo contains a naturally occurring antimicrobial agent known as “bamboo kun,” which actively inhibits bacterial growth. | Scratches from daily knife and utensil use create tiny micro-grooves where foodborne bacteria can harbor, resist wiping, and multiply. |
| Sustainability & Eco-Impact | Winner. Bamboo is a highly renewable, fast-growing grass that fully biodegrades in just 3–5 years. | Plastic organizers take roughly 450 years to decompose in a landfill and contribute to environmental microplastic shedding. |
| Sizing & Fit (Flexibility) | Winner. High-density bamboo expandable organizers adjust smoothly (e.g., from 13 to 21 inches) and remain highly stable under lateral drawer pressure. | Expandable plastic options often rely on thin, flimsy locking teeth that snap easily under pressure. |
| Upfront Cost vs. Lifetime Value | Long-Term Winner. Ranges from $25 to $45 upfront. However, because they last a decade, they offer excellent lifetime value. | Cheap upfront ($8 to $15). However, replacing cracked or broken plastic inserts multiple times quickly negates any initial savings. |
The Expert Affiliate Choice: Night Tree Bamboo Expandable Drawer Organizer
If you are looking for a beautiful, long-lasting, and hygienic upgrade, the Night Tree Bamboo Expandable Drawer Organizer is the clear winner. It adjusts beautifully to fit your drawer’s exact dimensions, resists bacteria, looks high-end, and is engineered to stand the test of time for up to a decade.
5. How to Stop Drawer Organizers from Sliding (The Physics of Drift)
It is one of the most frustrating aspects of kitchen organization: you buy a beautiful drawer organizer, place it inside, and every time you pull the drawer open, the entire organizer slides to the back. When you close it, it slams to the front.
This shifting is caused by low surface friction on slick drawer bases, combined with grease or debris buildup and the vibrational shocks of opening and closing drawers forcefully in a busy kitchen.
Fortunately, professional organizers use three reliable methods to stop drawer organizers from sliding:
Method 1: The Renter-Friendly “Museum Gel” Trick
Museum gel is a clear, non-toxic compound used by professional museum curators and home organizers alike.
- How to use it: Roll the gel into pea-sized dots and apply them to all four corners of the bottom of your drawer organizer. Press the organizer down firmly into the drawer for 30 seconds.
- The result: It creates a powerful, earthquake-proof hold. Because it is non-toxic and residue-free, you can pull the organizer up cleanly whenever you want without damaging the drawer surface.
Method 2: The Precision Lining Method
A custom-cut non-slip drawer liner provides excellent full-surface friction.
- How to use it: Drop a ruler inside and measure the exact interior dimensions of your drawer—do not guess! Cut a high-quality non-slip rubber mesh or PVC liner to these measurements, leaving a tiny 0.5 cm margin on each side.
- The result: The small margin prevents the liner from buckling or bunching up at the edges when you slide containers over it.
Method 3: The Two-Layer Pro Hack
For high-traffic, heavily used drawers, combine both methods. Lay down a precision-cut non-slip shelf liner across the drawer bottom, and then apply tiny dots of museum gel to the bottom corners of your bamboo or acrylic drawer organizer. This dual-layer approach locks the insert completely in place, even under heavy lateral forces.
6. DIY Step-by-Step: Custom Cardboard or Foam-Core Drawer Dividers
If you are on a tight budget, renting, or have highly unusual drawer dimensions, pre-made organizers might not work for you. Fortunately, you can easily create DIY drawer dividers using simple, inexpensive household materials.
This custom cardboard and foam-core tutorial is incredibly popular for budget-conscious and small-space living. Here is how to build your own:
DIY Custom Drawer Divider Tutorial
Materials & Tools Needed:
- Sturdy Foam Core boards or corrugated cardboard
- Self-adhesive, multipurpose cord/cable clips (acting as stability anchors)
- Decorative contact paper or peel-and-stick wallpaper
- A precision utility knife (such as a Cricut TrueControl Knife)
- A metal ruler and pencil
Step-by-Step Instructions:
- Measure with Precision: Measure the exact interior height, width, and depth of the kitchen drawer.
- Apply the “Subtract 1/2-Inch” Rule: Cut your foam-core board or cardboard to size using this exact formula: (Width or Depth minus 1/2 inch) x Height. The subtracted 1/2 inch is crucial—it leaves perfect clearance for the mounting hardware and stability anchors you’ll install next.
- Anchor for Stability: To stop cardboard or foam-core dividers from collapsing or shifting over time, use self-adhesive multipurpose cable clips. Slide the cable clips onto the outer ends of your cut divider boards, place them into the drawer to dry-fit, and mark their positions with a pencil. Remove the dividers, peel the adhesive backing, and stick the clips directly onto the inner drawer walls.
- Wrap for High-End Aesthetics: Wrap your cut boards in beautiful contact paper or peel-and-stick wallpaper. This completely hides the raw cardboard or foam edge, making your dividers look like custom, high-end built-in wood organizers.
- Cut Intersecting Grid Slots: If you want to create grid compartments (like a “+” shape for spices or small tools), cut intersecting slots. Use your utility knife to cut a 1/4-inch wide slit halfway down the middle of one board, and halfway up the middle of the intersecting board. Slip the slits into each other, letting them lock flush together in a sturdy grid.
7. Bringing It to the Bedroom: How Vertical “File Folding” Saves Clothes Drawer Space
Drawer organization isn’t just for small kitchens—it is a vital philosophy for maximizing space in small bedrooms, home offices, and closets, too! In the bedroom, the biggest drawer space-waster is traditional horizontal clothes stacking.
Why Vertical “File” Folding Beats Stacking
Traditional stacking compresses your clothing under its own weight and conceals everything except the top item. Vertical “file folding” (inspired by the KonMari folding method) stores garments upright like files in a filing cabinet. This eliminates bottom-of-the-pile wrinkles and gives you instant, 100% visibility of every single garment in the drawer the second you open it.
The Table Standing Test
The secret to successful file folding is not memorizing a rigid “thirds” folding rule. Instead, simply fold your garment (such as a t-shirt) into a compact, flat rectangle and set it down on its narrow, folded edge. If the garment can stand up on its own on a flat surface, you have folded it correctly!
The 1/2-Inch Ceiling Rule
Most people fail at vertical folding because they fold everything to a generic, random height. To avoid this:
- Drop a ruler inside and measure your bedroom drawer’s actual interior height.
- Always fold your garments at least 0.5 inches shorter than your drawer ceiling.
If your folded garments are flush with the top of the drawer, they will catch on the dresser frame when closing. This friction crushes the front row of clothes, causing the entire drawer system to collapse into a messy pile.
The Bulky Sweater Exception
Heavy knits, fleeces, and bulky sweaters are too thick to stand vertically without taking up excessive space. Instead of file folding them, fold them neatly in half and stack them horizontally in short, even piles of 2 to 3 items maximum. This prevents the bottom items from becoming crushed while maximizing your drawer height.
💡 Recommended Bedroom Divider: To keep your folded rows of clothes from falling over, use the Lifewit 4-Inch Drawer Dividers. They are the perfect, shallow height for top dresser drawers, preventing dividers from catching on the dresser frame.
Summary: Key Takeaways for Small Space Organization
To maintain an organized, highly functional kitchen (and home!), use this quick checklist to audit your drawers weekly:
- Ergonomics First: Favor deep, pull-out drawers over under-counter cupboards wherever possible to maximize accessible storage space.
- Measure Interiors, Not Exteriors: Never buy drawer dividers or organizers based on the exterior dimensions of your cabinets. Drop a ruler inside and measure the actual, raw interior clearance.
- Friction is Required: A beautiful drawer organizer is useless if it slides. Always back your inserts up with a custom-cut non-slip liner or small dots of museum gel on the corners.
- Enforce the Rule of 10: Keep utility drawers highly functional by enforcing a strict 10-item limit for loose items, and ruthlessly purge daily-use kitchen items back to their designated zones.
Ready to Transform Your Small Kitchen?
Don’t let cheap, cracked plastic and sliding organizers ruin your cooking routine. Upgrade your small kitchen drawers into an ergonomic haven of productivity today!
The Night Tree Bamboo Expandable Drawer Organizer gives you a perfect, slide-free fit that resists bacteria, looks stunning, and stands the test of time.
Frequently Asked Questions (FAQ)
1. How do I measure my kitchen drawers for organizers?
Never measure from the outside of your cabinet or dresser! Open the drawer fully, drop a ruler or measuring tape inside, and measure the exact interior width, depth (front to back), and height. If you are building custom DIY dividers, remember to apply the “Subtract 1/2-Inch” Rule from the height to leave room for mounting hardware.
2. Bamboo vs. plastic drawer organizers: which is more sanitary?
Bamboo is significantly more sanitary. High-quality bamboo contains a natural antimicrobial agent called “bamboo kun” which inhibits bacteria. Plastic organizers scratch easily from knives and utensils. These scratches form micro-grooves that trap moisture, food residue, and foodborne bacteria, making them difficult to wipe clean.
3. How can I stop drawer inserts from sliding when I open the drawer?
You can stop slide and drift using clear, non-toxic museum gel or a custom-cut non-slip rubber/PVC drawer liner. For high-traffic drawers, combine both methods: lay down a precision-cut non-slip liner and apply pea-sized dots of museum gel to the four corners of the organizer insert to lock it completely in place.
4. What items should never go in a kitchen utility drawer?
You should immediately relocate heavy tools (like screwdrivers or hammers) to the garage, and office accessories (like excess charging cables or office files) to the home office. Keep your utility drawer strictly limited to essential household quick-access items, and enforce the Rule of 10 to prevent clutter.
5. Can I use the vertical “file folding” method for bulky winter sweaters?
No. Bulky knits and fleece sweaters are too thick and heavy to stand upright. Instead, use the bulky sweater exception: fold them in half and stack them horizontally in short piles of 2 to 3 items maximum.