Cabinet Organization Ideas Kitchen: 5 Genius Storage Hacks!
This article contains affiliate links. If you purchase through these links, we may earn a small commission at no extra cost to you.
If you have ever stood in your kitchen, holding a pot lid in one hand and a stack of mixing bowls in the other, wondering why preparing a simple dinner feels like a high-stakes game of Tetris, you are not alone. My own turning point came when a heavy cast-iron skillet came crashing out of an upper cabinet, narrowly missing my foot and leaving a dent in the floor. That was the day I realized my small kitchen wasn’t just cluttered; it was poorly designed.
Cabinet organization isn’t about achieving sterile, photographic perfection for social media. It’s about creating flow, protecting your investment from hidden leaks, and making daily cooking frictionless. By understanding the physical layout of your cabinets and utilizing clever aftermarket solutions, you can transform your kitchen from a source of daily frustration into a highly efficient, joyful workspace. Here is your ultimate guide to reclaiming every inch.
1. Cabinet Design Ideas Kitchen: Ergonomics and Layout Foundations
Before you run out and buy a dozen plastic organizing bins, it is critical to understand the mechanical and structural bones of your kitchen. True organization is only as good as the layout of the cabinetry itself.
Standard Ergonomic Dimensions and Reach Zones
Kitchen design is built on standard dimensions optimized for the human body. Standard base cabinets are typically 24 inches (610 mm) deep and 34.5 inches (880 mm) high, which, when combined with a standard countertop, creates a finished working height of 36 inches (910 mm). Upper or wall cabinets are conventionally 12 inches (300 mm) deep and positioned exactly 18 inches (460 mm) above the countertop.
Understanding these numbers helps you map your “reach zones.” Items used daily should live in the comfortable middle envelope, while heavy or infrequently used items belong in the lower base shelves or the very top of upper cabinets.
The Work Triangle and Flow
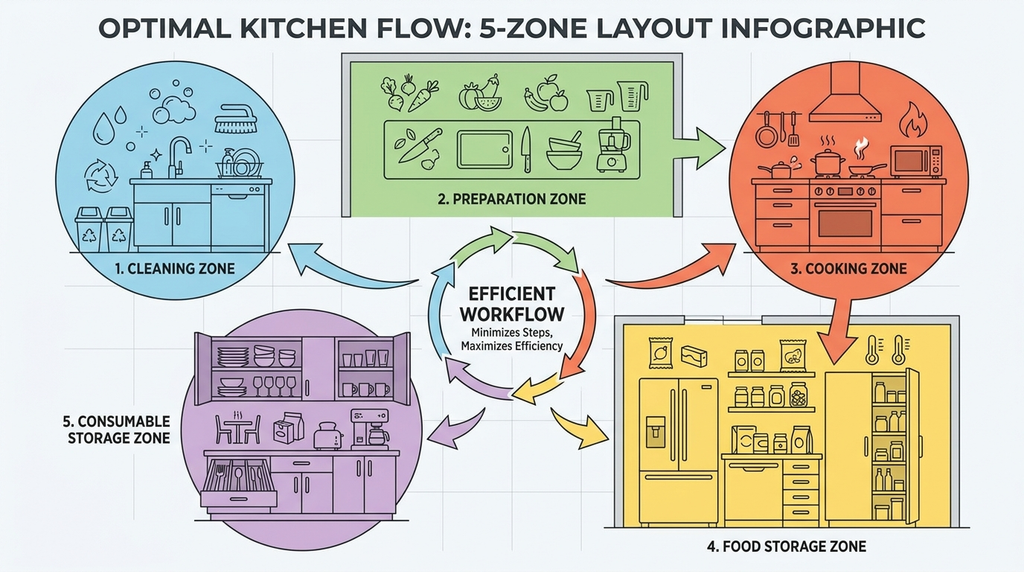
A highly efficient kitchen respects the classic “triangle of movement” between your sink, stove, and refrigerator. To prevent traffic jams and excessive walking, the optimal perimeter of this triangle should be between 4 and 8 meters, with individual sides measuring between 1.25 and 2.75 meters.
Alternatively, modern design often utilizes the “diamond shape rule”, which divides your kitchen into four functional zones:
- Dry preparation
- Wet preparation (near the sink)
- Cooking (surrounding the stove)
- Food storage
Face-Frame vs. Frameless (Full-Access) Cabinetry
How much physical space you have inside your cabinets depends heavily on whether your kitchen uses American “face-frame” or European “frameless” construction:
- Face-Frame Cabinets: These feature a wooden frame (usually stiles that are 1.5 inches wide) attached to the front of the cabinet box. Because of this, drawers or pull-out trays must be at least 2 inches narrower than the cabinet interior just to clear the stiles when opening. This results in a substantial loss of horizontal storage space, particularly in cabinets that are 15 inches wide or narrower.
- Frameless Cabinets: Also known as European or full-access cabinets, these have side panels that are 3/4 inch thick with no face frame or center stile. Drawers can be sized nearly to the interior opening, maximizing horizontal storage space.
If you are remodeling or refacing, prioritizing frameless cabinetry is one of the best design decisions you can make for a small kitchen. Additionally, ensure that your kitchen’s window area covers at least 10% of the kitchen floor area to guarantee proper ventilation and natural light over your main preparation zones.
Learn how to optimize your drawer layout in our comprehensive “kitchen drawer organization zone method” guide.
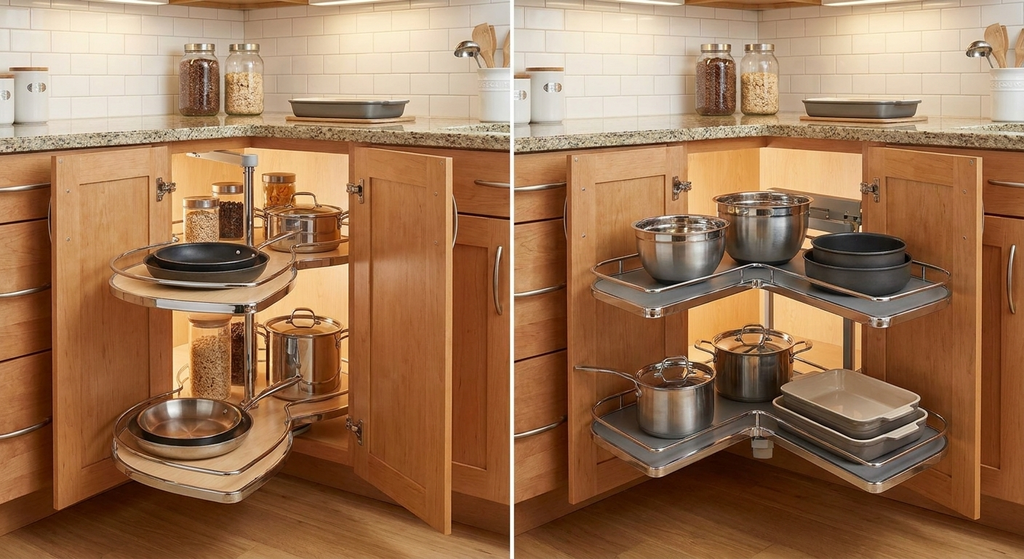
2. Corner Cabinet Storage Ideas Kitchen: Lazy Susan vs. Blind Corner
Corner cabinets represent a massive amount of potential storage—often equivalent to two or three standard cabinets. However, without the right hardware, they easily turn into dark, awkward voids where small appliances go to die. Deciding how to organize this space depends entirely on your cabinetry’s construction and what you need to store.
The Mechanical Anatomy of Corner Cabinets
There are three main ways corners are handled in kitchen design:
- L-Shaped Corner Cabinets: These sit directly in the corner with a bifold door or two independent doors opening at a right angle (typically measuring 900×900 mm). These are highly compatible with rotating carousel mechanisms.
- Blind Corner Cabinets: This layout features a straight cabinet extending past the visible door, creating a hidden, hard-to-reach blind section.
- Void Corners: Sometimes, the most practical design decision is to leave the corner completely empty (voided). This allows for wider, highly functional drawer runs on either side of the junction without losing space to corner hardware clearance.
The Corner Post Necessity
When installing hardware in blind corners, you must account for the clearance of adjacent doors and drawers. These configurations almost always require a vertical corner post (typically 50 to 75 mm wide) to create a gap. Without this post, drawers or cabinet doors on the adjoining run will collide with the handles of the corner cabinet when opened. Note: L-shaped, angled, or corner drawer cabinets do not require corner posts.
The Ultimate Lazy Susan vs. Blind Corner Pull-Out Showdown
| Comparison Criterion | Lazy Susan (Rotating Mechanism) | Blind Corner Organizer (Pull-Out System) |
|---|---|---|
| Best Suited For | Small, lightweight items (spices, condiments, daily oils) | Large, bulky, or heavy cookware (pots, pans, baking dishes) |
| Accessibility Type | Rotates items to the front with a simple spin | Pull-out or swinging shelves bring the entire inventory into full view |
| Dead Space | Leaves dead space in the square corners of the cabinet | Maximizes the full square footage of deep corners |
| Weight Capacity | Limited by rotating spindle mechanisms; overloading causes warping | High-duty steel runners hold heavier loads (up to 55 lbs per shelf) |
| Retrofitting Ease | Easier to install on new designs; door-mounted types require exact alignment | High compatibility with aftermarket slide-out kits |
| Cabinet Entry Type | Center-opening or angled-opening cabinets | Side-opening cabinets |
| Corner Post Needed | No corner post required | Almost always requires a 50–75 mm corner post |
| Door Integration | Doors can be mounted directly to spin with the unit | Can attach directly to slide/swing out when the door is opened |
| Spindle Constraints | Center poles can block larger platters/pans | Poleless options swing entirely clear of the cabinet opening |
| Cost Profile | Typically lower to mid-range | Mid-range to premium (due to complex articulating hardware) |
Top Recommended Hardware Solutions
Lazy Susan Picks
- Rev-A-Shelf 32″ Natural Maple Kidney Lazy Susan (Model 53472-32MP-1): Crafted from solid maple wood that won’t warp, this unit features an adjustable post (26″ to 32″) and independently rotating shelves. It is ideal for storing pantry staples and oils.
- Rev-A-Shelf 28″ Polymer Pie-Cut Lazy Susan (Model 6942-28-15-52): A door-mounted design featuring thick-walled almond polymer shelves that spin smoothly with the cabinet doors, keeping items accessible.
- Vauth Sagel COR Wheel Pro Planero (Model CORWHPLK27WNT): A premium poleless kidney lazy susan that increases storage capacity by 20% and supports an impressive 60 lbs per shelf, eliminating the center pole obstruction.
Blind Corner Picks
- Rev-A-Shelf Elite Steel Two-Tier with Soft-Close (Model 53PSPE-15SC-MP): Featuring solid maple and heavy-duty steel shelves, the top and bottom tiers pull out independently so you never have to disturb front items to reach the back.
- Vauth Sagel Cornerstone Swing Scalea 36″ (Model CSWINGSC15WNT): Features power-assisted, tool-free assembly shelves that handle 55 lbs each and swing completely out of 18-inch openings.
- Kessebohmer LeMans II Arena Classic: A legendary system of two articulating kidney-shaped shelves on independent arms, supporting up to 25 kg per shelf and gliding out with absolute precision.
3. Under Cabinet Storage Ideas Kitchen: Harnessing Dead Vertical Space
In small kitchens, vertical space is precious, untapped real estate. Going vertical lets you double your storage capacity without changing your kitchen’s footprint.
Actionable Vertical Hacks for Upper and Lower Cabinets
- Under-Shelf Baskets & Risers: Reclaim the “dead air” at the top of your cabinet shelves. Adding wire under-shelf baskets or stackable shelf risers allows you to layer plates, bowls, and pantry staples without creating messy, unsafe stacks.
- Door-Mounted Organizers: Install narrow, doweled door racks on the inside of cabinet doors to hold cutting boards, measuring cups, and pot lids, keeping them within arm’s reach.
- Tension Rod Partitions: Place tension rods vertically in deep cabinets to create slender vertical slots. This is an incredibly simple, tool-free way to organize baking sheets, cookie trays, and cutting boards.
Adhesive and Magnetic Solutions for Renters
If you are renting and cannot drill into your cabinetry, look for drill-free acrylic floating shelves with bamboo lids or adhesive magnetic containers. Installing drill-free adhesive acrylic spice strips on the inside of upper cabinet doors is an excellent way to keep your spices organized and visible without violating your lease.
- If your spices are taking over, check out our guide on “07 ways to tame your spice drawer with tilted inserts”.
4. Kitchen Cabinet Organization Ideas on a Budget: The Under-Sink Reset
Statistically, 73% of homeowners actively avoid organizing their under-sink cabinet because awkward plumbing, such as garbage disposals, p-traps, and dishwasher lines, makes it feel impossible to organize. However, leaving this area neglected leads to duplicate buying (costing an estimated $50 to $100 per year in forgotten cleaning supplies) and undetected moisture damage.
The Crucial Safety Rule
Before starting your under-sink reset, remember this safety rule: Only store cleaners under the sink. Never store food (due to moisture and pest risk), paper goods (which readily absorb chemical fumes), or small appliances.
The Under-$50 Reset Blueprint
You don’t need a luxury budget to fix this area. Here is a step-by-step under-$50 blueprint:
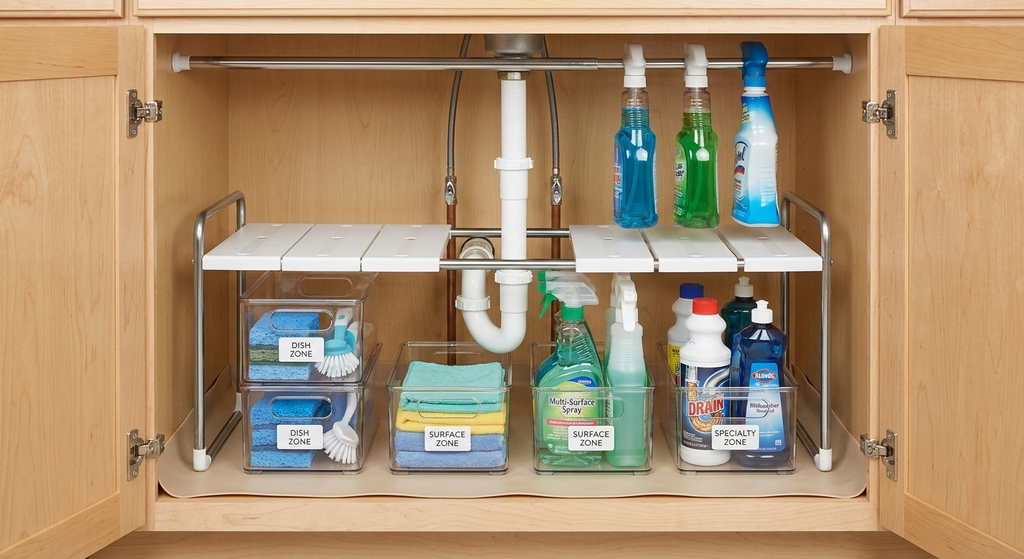
- Waterproof Under-Sink Tray/Liner ($8–$15): This is the single cheapest insurance policy you can buy. It catches slow plumbing leaks that would otherwise rot your cabinet wood and swell particleboard.
- Tiered P-Trap Expandable Shelf ($25–$45): A metal-framed tiered shelf featuring removable plastic panels that literally step over your drain pipes and water lines, doubling your usable inventory.
- Tension Rod Spray Bottle Holder ($8–$15): Reclaim bottom shelf space by installing a tension rod 6 to 8 inches below the cabinet ceiling and hanging spray bottles by their triggers.
- Zoned Categorized Stacking Bins: Divide your supplies into three strict zones:
- Dish Zone: Dish soaps, sponges, and dish brushes.
- Surface Zone: Microfiber cloths and multi-surface sprays.
- Specialty Zone: Drain cleaners and dishwasher rinse aids.
Emergency Mold Tip
If you ever detect a musty odor under your sink, inspect for slow leaks immediately. To clean mold or biofilm safely, empty the cabinet, spray a 50/50 mix of white vinegar and water, and let it air-dry for 24 hours with the cabinet doors wide open.
5. 10 Clever Renter-Friendly Storage Hacks (Security Deposit Safe)
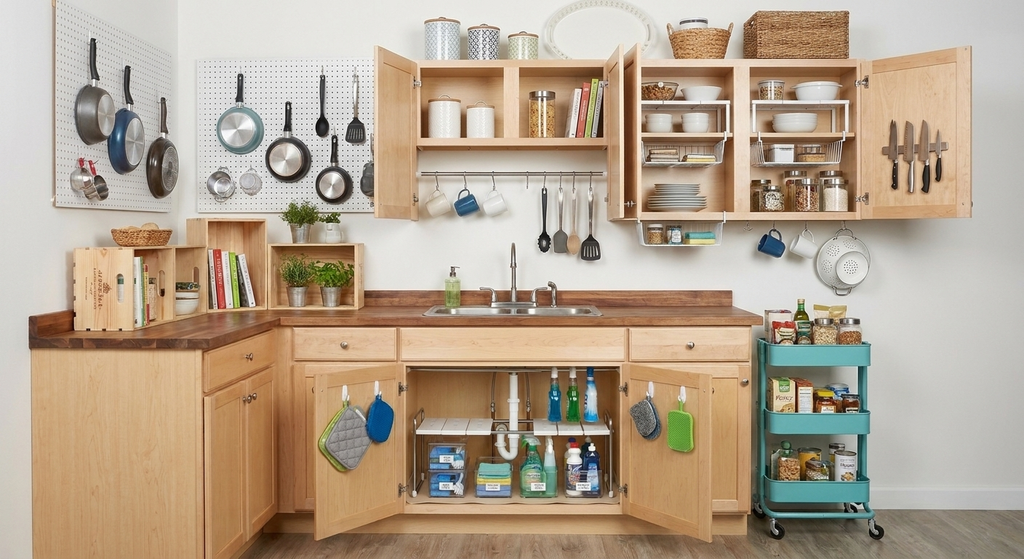
Renters should never have to choose between a functional kitchen and getting their security deposit back. These temporary, drill-free solutions maximize rentals without modifying the millwork.
- Shelf Risers: Reclaim vertical air space on cabinet shelves without drilling new shelf pin holes.
- Flipped Wine Crates: Position a sturdy wooden wine crate on its side on the countertop to create instant, stylish open shelving.
- Adhesive Command Hooks: Hang potholders, measuring spoons, and scrubbers on the inside of cabinet doors.
- Tippy-Tops of Cabinets: Utilize the open space above your wall cabinets for decorative canisters, dry goods, or occasionally-used platters.
- Pegboards: Hang a single pegboard with minimal wall damage (easily spackled) to suspend pans and large utensils.
- Curtain Rails & S-Hooks: Mount a light tension or curtain rod under upper cabinets to suspend mugs and cooking utensils.
- Under-Shelf Baskets: Slide wire under-shelf baskets onto existing cabinet shelves to create secondary compartments.
- Rolling Utility Carts: Use a wheeled cart (like the classic IKEA RÅSKOG) that can be tucked away in a pantry or adjoining alcove when not in use.
- Cabinet Side Spaces: Use magnetic knife blocks or Command adhesive strips on the flat exterior sides of cabinets to hang tools.
- Screw Hooks Under Cabinets: Landlords rarely notice small cup hooks screwed under the overhang of cabinets to hang mugs and strainers.
6. Next-Level Hidden Kitchen Storage Trends
If you are designing custom cabinetry or undergoing a complete kitchen refresh, integrating built-in hidden solutions keeps countertops completely pristine.
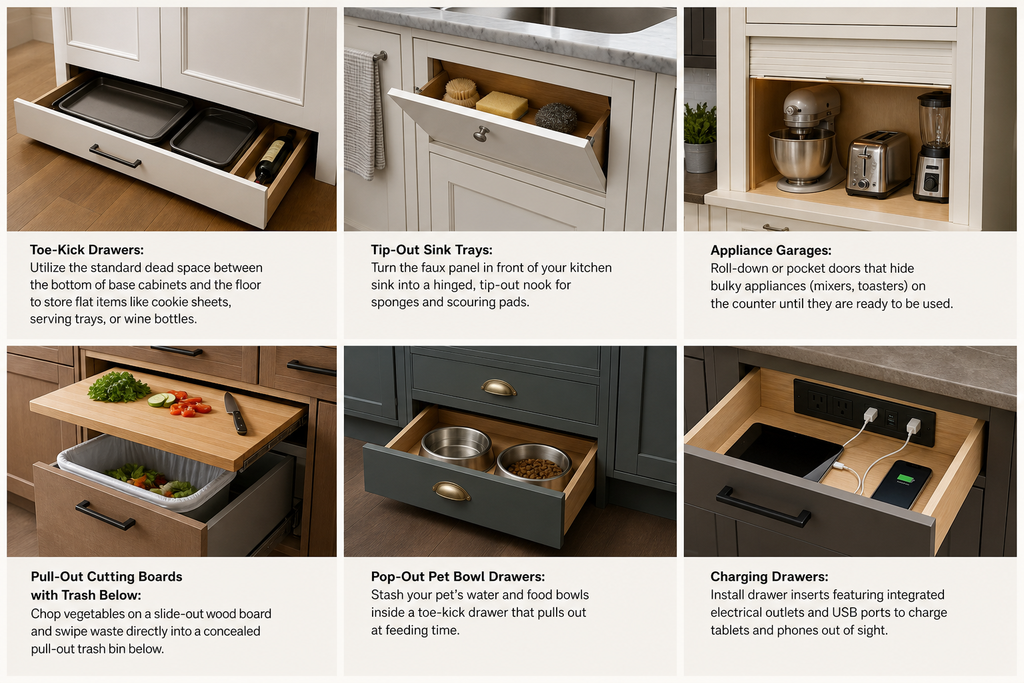
- Toe-Kick Drawers: Utilize the standard dead space between the bottom of base cabinets and the floor to store flat items like cookie sheets, serving trays, or wine bottles.
- Tip-Out Sink Trays: Turn the faux panel in front of your kitchen sink into a hinged, tip-out nook for sponges and scouring pads.
- Appliance Garages: Roll-down or pocket doors that hide bulky appliances (mixers, toasters) on the counter until they are ready to be used.
- Pull-Out Cutting Boards with Trash Below: Chop vegetables on a slide-out wood board and swipe waste directly into a concealed pull-out trash bin below.
- Pop-Out Pet Bowl Drawers: Stash your pet’s water and food bowls inside a toe-kick drawer that pulls out at feeding time.
- Charging Drawers: Install drawer inserts featuring integrated electrical outlets and USB ports to charge tablets and phones out of sight.
Conclusion
An organized kitchen cabinet isn’t about aesthetics—it is about creating a frictionless environment where cooking feels like a pleasure rather than a chore. If you are ready to conquer your kitchen storage bottlenecks, start with a high-ROI zone.
If you struggle with an awkward corner, invest in a heavy-duty articulating organizer like the Kessebohmer LeMans II or the poleless Vauth Sagel Planero for instant, physical relief. If you want to conquer your worst storage nightmare on a budget, start under the sink with an expandable shelf and a leak-proof mat.
FAQ
Q1: Can I install a blind corner organizer in any corner cabinet?
No. Blind corner organizers require a straight cabinet that extends past a visible door into a hidden space. They also almost always require a 50–75 mm corner post to prevent the hardware from colliding with adjoining drawer handles. If you have an L-shaped corner with bifold doors, a rotating Lazy Susan is the correct fit.
Q2: What should I never store under the kitchen sink?
Never store food (due to moisture and pest risk), paper goods (which readily absorb chemical fumes), or small appliances. Keep this space restricted to household cleaners and dish washing supplies.
Q3: Why are my drawers hitting the adjacent cabinet handles?
This occurs in L-shaped kitchens where a vertical corner post (typically 50 to 75 mm wide) was omitted during cabinet design. Without this post, the drawers lack the necessary clearance to glide past the handles of adjacent cabinetry.
Q4: How do I clean a musty under-sink cabinet?
First, empty the cabinet entirely and inspect for slow plumbing leaks. To clean musty odors or biofilm safely, spray the interior with a 50/50 mix of white vinegar and water, and let it air-dry for 24 hours with the doors open.
Q5: What is the difference between face-frame and frameless cabinets for storage?
Face-frame cabinets have a front wooden border that restricts horizontal space, requiring drawers to be at least 2 inches narrower than the cabinet interior. Frameless cabinets have no front frame, allowing drawers and pull-outs to utilize the full width of the cabinet interior.